
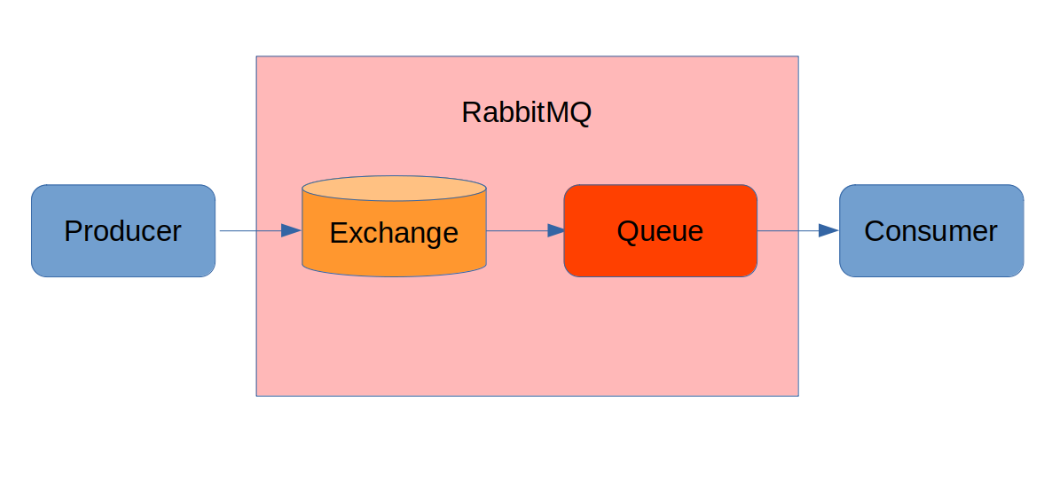
Implementing messaging in Java full stack applications with RabbitMQ allows for asynchronous communication between different components of the system. RabbitMQ is a robust and popular message broker that enables the exchange of messages between producers and consumers. Here’s how you can integrate RabbitMQ into your Java full stack application:
- Install and Set Up RabbitMQ:
Download and install RabbitMQ on your server or use a managed RabbitMQ service. Ensure that RabbitMQ is running and accessible from your Java application. - Add RabbitMQ Dependency:
Include the RabbitMQ client library as a dependency in your Java project. If you’re using Maven, add the following dependency to yourpom.xml:
   <dependency>
     <groupId>com.rabbitmq</groupId>
     <artifactId>amqp-client</artifactId>
     <version>5.12.0</version>
</dependency>- Define Message Producers:
Identify components in your application that will produce messages and establish a connection to RabbitMQ. Use the RabbitMQ Java client to create a connection, channel, and exchange. Publish messages to the exchange with relevant routing keys.
   ConnectionFactory factory = new ConnectionFactory();
   factory.setHost("localhost");
   Connection connection = factory.newConnection();
   Channel channel = connection.createChannel();

   channel.exchangeDeclare("myExchange", BuiltinExchangeType.DIRECT);
   String message = "Hello, RabbitMQ!";
   channel.basicPublish("myExchange", "myRoutingKey", null, message.getBytes());

   channel.close();
connection.close();- Define Message Consumers:
Identify components in your application that will consume messages from RabbitMQ. Create a connection, channel, and queue. Bind the queue to the exchange with relevant routing keys. Implement a message handler to process received messages.
   ConnectionFactory factory = new ConnectionFactory();
   factory.setHost("localhost");
   Connection connection = factory.newConnection();
   Channel channel = connection.createChannel();

   channel.exchangeDeclare("myExchange", BuiltinExchangeType.DIRECT);
   String queueName = channel.queueDeclare().getQueue();
   channel.queueBind(queueName, "myExchange", "myRoutingKey");

   DeliverCallback deliverCallback = (consumerTag, delivery) -> {
     String message = new String(delivery.getBody());
     // Process the received message
   };

   channel.basicConsume(queueName, true, deliverCallback, consumerTag -> {});

// Wait for messages...- Handle Message Processing:
Implement the necessary logic in the message consumer to process the received messages. This may include storing data, triggering actions, or forwarding messages to other components of the system. - Error Handling and Retry:
Consider implementing error handling and retry mechanisms in case message processing fails. You can use RabbitMQ’s Dead Letter Exchange (DLX) feature or other error handling strategies to handle failed messages. - Test and Monitor:
Test your application to ensure that messages are being sent and received correctly. Monitor the RabbitMQ server and message queues to identify any potential issues or bottlenecks.
By incorporating RabbitMQ messaging into your Java full stack application, you can decouple components and enable asynchronous communication, improving the scalability and reliability of your system. RabbitMQ provides various features like message persistence, acknowledgments, and message routing options, which can be utilized to meet the requirements of your application.