Overview
In this blog, we’ve covered the step-by-step process of creating a job application form using React. We started by setting up a new React project using Create React App and then built the form structure with fields for personal information, job role preference, address, and CV upload. Each form field was added using appropriate HTML elements, and basic styling was applied for improved appearance. React’s component-based architecture and state management were leveraged to create dynamic and responsive forms. With this overview, you should be equipped to start creating your own forms in React projects, tailored to your specific needs.
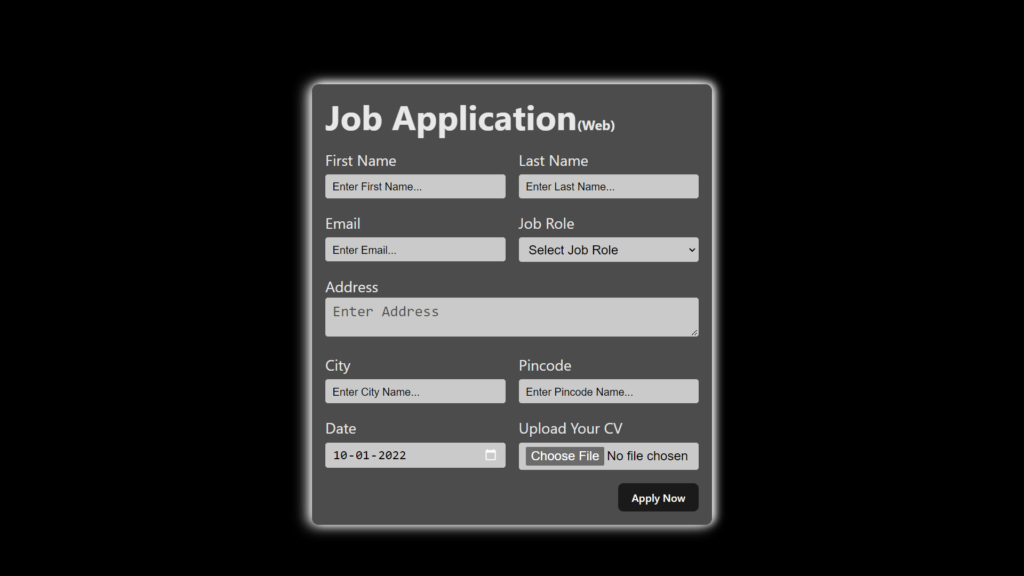
In this blog, we’ll walk through the step-by-step process of creating a simple job application form using React. This form will include fields for the applicant’s personal information, job role preference, address, and the ability to upload a CV.
Step 1: Setting up the Environment
We’ll start by setting up a React project. For simplicity, we’ll use Vite to generate a new React project.
					npm create vite@latest job-application-form
cd job-application-form
Step 2: Project Structure
After generating the project, your folder structure should look like this:
					job-application-form/
|-- src/
    |-- App.css
    |-- App.js
    |-- index.css
    |-- index.js
    |-- assets/
        |-- react.svg
        |-- vite.svg
Step 3: Creating the Form
Open App.jsx and copy paste the below given code.
					import './App.css'
function App() {
  return (
        <h1>
          Job Application
          (Web)
        </h1>
        <form action="">
              <label for="first_name"> First Name </label>
              <input
                id="first_name"
                name="first_name"
                placeholder="Enter First Name..."
              />
              <label for="last_name"> Last Name </label>
              <input
                id="last_name"
                name="last_name"
                placeholder="Enter Last Name..."
              />
              <label for="email"> Email </label>
              <input
                type="email"
                id="email"
                name="email"
                placeholder="Enter Email..."
              />
              <label for="job_role"> Job Role </label>
              <select id="job_role" name="job_role">
                <option value="">Select Job Role</option>
                <option value="frontend">Frontend Developer</option>
                <option value="backend">Backend Developer</option>
                <option value="full_stack">Full Stack Developer</option>
                <option value="ui_ux">UI UX Designer</option>
              </select>
              <label for="address"> Address </label>
              <textarea
                id="address"
                name="address"
                row="4"
                cols="50"
                placeholder="Enter Address"
              ></textarea>
              <label for="city"> City </label>
              <input id="city" name="city" placeholder="Enter City Name..." />
              <label for="pincode"> Pincode </label>
              <input
                type="number"
                id="pincode"
                name="pincode"
                placeholder="Enter Pincode Name..."
              />
              <label for="date"> Date </label>
              <input value="2022-01-10" type="date" id="date" name="date" />
              <label for="upload"> Upload Your CV </label>
              <input type="file" id="upload" name="upload" />
            <button type="submit">Apply Now</button>
        </form>
  )
}
export default App
Step 4: Styling the Form
Open App.css and add some styling to make the form look decent.
					:root{
  --bodyBg:black;
  --applicationBg:rgba(255, 255, 255, 0.299);
}
* {
  margin: 0;
  padding: 0;
  box-sizing: border-box;
}
body {
  background-color: var(--bodyBg);
  .container {
    display: flex;
    position: relative;
    height: 100vh;
    border: 2px solid black;
    width: 100vw;
    justify-content: center;
    align-items: center;
    /* max-width: 900px; */
    margin: 0 auto;
    .apply_box {
      /* position: absolute;
      top:50%;
      left50%; */
      max-width: 600px;
      padding: 20px;
      background-color: rgba(34, 32, 32, 0.324);
      margin: 0 auto;
      margin-top: 50px;
      box-shadow: 5px -2px 13px rgb(255, 255, 255), -6px 1px 20px rgb(255, 255, 255);
      border-radius: 10px;
      background-color: var(--applicationBg);
    }
    .title_small {
      font-size: 20px;
    }
  }
}
.form_container {
  margin-top: 20px;
  display: grid;
  grid-template-columns: repeat(auto-fit, minmax(200px, 1fr));
  gap: 20px;
}
.form_control {
  display: flex;
  flex-direction: column;
}
label {
  font-size: calc(100% + 0.4rem);
  margin-bottom: 5px;
}
input,
select,
textarea {
  padding: 6px 10px;
  border: 1px solid hsl(0, 0%, 80%);
  border-radius: 4px;
  color:black;
  font-size: calc(100% + 0.2rem);
  background-color: rgb(202, 202, 202);
}
textarea::placeholder{
  font-size: calc(100% + 0.2rem);
  color:rgba(0, 0, 0, 0.61);
}
input:focus {
  outline-color: red;
}
.button_container {
  display: flex;
  justify-content: flex-end;
  margin-top: 20px;
}
button {
  background-color: red;
  border: transparent solid 2px;
  padding: 5px 10px;
  color: white;
  border-radius: 8px;
  transition: 0.3s ease-in;
}
button:hover {
  background-color: #ccc;
  border: 2px solid red;
  color: black;
  transition: 0.3s ease-out;
  cursor: pointer;
}
.textarea_control {
  grid-column: 1 / span 2;
}
.textarea_control textarea {
  width: 100%;
}
input::placeholder{
  font-size: 1rem;
  color:rgb(0, 0, 0);
}
@media (max-width: 460px) {
  .textarea_control {
    grid-column: 1 / span 1;
  }
} ;
Code Explanation
-
Step 1 : Creating job application form structure
-
Creating a form wrapper class by the name of apply_box.
-
					import { useState } from 'react';
import reactLogo from './assets/react.svg';
import viteLogo from './assets/vite.svg';
import './App.css';
function App() {
  return (
        <h1>
          Job Application (Web)
        </h1>
        <form action="">
          {/* Form controls will go here */}
        </form>
  );
}
export default App;
Step 2: Adding Form Fields
Let’s add form fields for first name, last name, email, job role, address, city, pincode, date, and CV upload.
  <label htmlFor="first_name">First Name</label>
  <input
    id="first_name"
    name="first_name"
    placeholder="Enter First Name..."
  />
  <label htmlFor="last_name">Last Name</label>
  <input
    id="last_name"
    name="last_name"
    placeholder="Enter Last Name..."
  />
  <label htmlFor="email">Email</label>
  <input
    type="email"
    id="email"
    name="email"
    placeholder="Enter Email..."
  />
  <label htmlFor="job_role">Job Role</label>
  <select id="job_role" name="job_role">
    <option value="">Select Job Role</option>
    <option value="frontend">Frontend Developer</option>
    <option value="backend">Backend Developer</option>
    <option value="full_stack">Full Stack Developer</option>
    <option value="ui_ux">UI UX Designer</option>
  </select>
  <label htmlFor="address">Address</label>
  <textarea
    id="address"
    name="address"
    rows="4"
    cols="50"
    placeholder="Enter Address"
  ></textarea>
  <label htmlFor="city">City</label>
  <input id="city" name="city" placeholder="Enter City Name..." />
  <label htmlFor="pincode">Pincode</label>
  <input
    type="number"
    id="pincode"
    name="pincode"
    placeholder="Enter Pincode..."
  />
  <label htmlFor="date">Date</label>
  <input value="2022-01-10" type="date" id="date" name="date" />
  <label htmlFor="upload">Upload Your CV</label>
  <input type="file" id="upload" name="upload" />
Step 3: Adding the Form Submit button
-
- Add a submit button to the form.
<button type="submit">Apply Now</button>
And that’s it! You’ve successfully created a simple job application form using React. Feel free to customize it further to suit your needs.
Conclusion:
In this blog, we’ve walked through the process of creating a simple job application form using React. We started by setting up a React project and then built the form step by step, adding fields for personal information, job role preference, address, and CV upload.
We utilized React’s component-based architecture to create reusable form elements and useState hook to manage form state if needed.
Styling was added to make the form visually appealing and user-friendly. We kept the styling simple for this example, but you can easily extend it to fit your design preferences.
Creating forms in React provides a powerful way to handle user input and interaction in web applications. With React’s declarative approach, managing form state and handling user events becomes more intuitive and efficient.
Remember, this is just a basic example. Depending on your project requirements, you might need to add validation, integrate with a backend service for form submission, or include additional features like dynamic form fields.
Feel free to experiment and expand upon this example to build more complex forms tailored to your specific needs. Happy coding!