Creating a WeatherApp through ReactJS for absolute Beginners.
Overview:
In this tutorial, we’ll walk through the process of building a simple weather web app using ReactJS. This tutorial is aimed at beginner-level programmers who are new to React and want to understand the basics of building a single-page application.
Prerequisites:
- Basic understanding of HTML, CSS, and JavaScript.
- Familiarity with ReactJS concepts like components and state management.
Step 1: Setting Up the Project:
Before any step make sure that you have NodeJS installed in your machine. If not then you can visit the below link to download NodeJS.
https://nodejs.org/en/download/current
You can choose the LTS version (Long term support) as it is the most stable version. After NodeJs is installed we’ll setup Vite which is a frontend tool that is used for building fast and optimized web applications
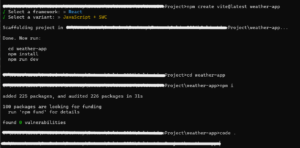
First, let’s set up a new React project using vite. If you haven’t installed it yet, you can do so by running the following command:
Installing Vite:
npm create vite@latest my-weather-app
- Choose React as framework.
- Choose JavaScript + SWC as Variant.
- Cd to your app by doing “cd app-name”
- Run “Npm I” to install node in the respective directory.
- Open VSCode by typing “ code .” in command prompt.

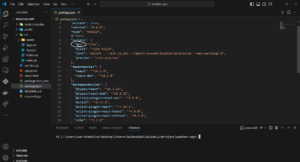
Modifying package.json:
- Change “dev” to “start” in package.json
- Go to terminal In VSCode (press Ctrl + J in windows)
- Type “npm start” in terminal

Vite will start a local server and it would look something like this:

Either press “ctrl + o” to open the server in chrome. Or simply just ctrl + left click on the localhost link.
Congratulations students your first WebApp is created!
Step 2: Creating the WeatherApp Component:
App.jsx file:
					import React, { useState, useEffect } from 'react';
import YOUR_API_KEY from './Key';
import "./App.css"
function App() {

  const [weatherData, setWeatherData] = useState("");
  const [city, setCity] = useState('');
  const [loading, setLoading] = useState(false);

  // Function to fetch weather data
  const fetchWeatherData = async () => {
    setLoading(true);
    try {
      const response = await fetch(
        `https://api.weatherapi.com/v1/current.json?key=${YOUR_API_KEY}&q=${city}&aqi=no`
      );
      const data = await response.json();
      console.log(await data)
      setWeatherData(data);
      setLoading(false);
    } catch (error) {
      console.error('Error fetching weather data: ', error);
      setLoading(false);
    }
  };

  // Function to handle form submission
  const handleSubmit = (e) => {
    e.preventDefault();
    fetchWeatherData();
  };


  return (
    <div className="wrapper">
      <div className='nested-div'>
        <h1>Weather App</h1>
        <form>
          <input
            type="text"
            placeholder="Enter city"
            value={city}
            onChange={(e) => setCity(e.target.value)}
            style={{"width":"100%","height":"50%"}}
          />
          <button type="submit" onClick={handleSubmit}>Get Weather</button>
        </form>


        {loading ? (
          <p>Loading...</p>
        ) : weatherData ? (
          <div>
            <h2>City: {weatherData.location.name}</h2>
            <h4>Region: {weatherData.location.region}</h4>
            <p>Temperature: {weatherData.current.temp_c}°C</p>
            <p>Humidity: {weatherData.current.condition.text}</p>
          </div>
        ) : (
          <p>No data available</p>
        )}
      </div>

    </div>
  )
}

export default App
App.css FIle:
					.wrapper{
  display: flex;
  height: 100vh;
  width: 100vw;
  justify-content: center;
  align-items: center;
  border: 1px solid black;
}
.nested-div{
  display: flex;
  flex-direction: column;
}
Index.html File:
					<!doctype html>
<html lang="en">
  <head>
    <meta charset="UTF-8" />
    <link rel="icon" type="image/svg+xml" href="/vite.svg" />
    <meta name="viewport" content="width=device-width, initial-scale=1.0" />
    <!-- Dont forget to import CDN of CSS for Bootstrap -->
    <link href="https://cdn.jsdelivr.net/npm/bootstrap@5.3.3/dist/css/bootstrap.min.css" rel="stylesheet" integrity="sha384-QWTKZyjpPEjISv5WaRU9OFeRpok6YctnYmDr5pNlyT2bRjXh0JMhjY6hW+ALEwIH" crossorigin="anonymous">
    <title>Vite + React</title>
  </head>
  <body>
    <div id="root"></div>
    <!-- Dont forget to import CDN of JS For bootstrap -->
    <script src="https://cdn.jsdelivr.net/npm/bootstrap@5.3.3/dist/js/bootstrap.bundle.min.js" integrity="sha384-YvpcrYf0tY3lHB60NNkmXc5s9fDVZLESaAA55NDzOxhy9GkcIdslK1eN7N6jIeHz" crossorigin="anonymous"></script>
    <script type="module" src="/src/main.jsx"></script>
  </body>
</html>
Key.jsx :
					const YOUR_API_KEY = "Your own api key"

export default YOUR_API_KEY
NOTE: You need to get yourself an api key from weatherapi site. Register yourself on the site and generate an api token. Copy that token and paste it in the above “YOUR_API_KEY” field. Finally in terminal , type “npm start” to start the local server and open the link provided by terminal in chrome or any supported browser.
Congratulations ! Your Weather app is all good and running.
Step 3 : Code explanation:
- We use the useState hook to manage the state variables: weatherData, city, loading, and error. These variables are used to store weather data, the user’s input city, loading state, and error messages, respectively.
- The fetchWeatherData function is responsible for fetching weather data from the WeatherAPI when the form is submitted. It checks if the city variable is empty before making the API call. If it’s empty, it sets an error message. Otherwise, it makes the API call using fetch.
- The handleSubmit function is called when the form is submitted, triggering the fetchWeatherData function.
- In the JSX part, we render the UI of the weather app, including a form with an input field for the city and a button to submit the form. We also display loading text while fetching data and display the weather information once it’s available.
- .wrapper: This class is applied to a container element that wraps our entire weather app. It’s configured to utilize Flexbox layout properties:
- display: flex; – This makes the container a flex container, allowing its children to be flex items.
- height: 100vh; width: 100vw; – This sets the height and width of the container to 100% of the viewport height and width, respectively. This ensures that the container takes up the entire screen.
- justify-content: center; align-items: center; – These properties horizontally and vertically center the content of the container within the viewport.
- border: 1px solid black; – This adds a black border around the container, providing a visual boundary.
- .nested-div: This class is applied to a nested container within the main wrapper. It’s also configured to use Flexbox layout properties:
- display: flex; – This makes the nested container a flex container as well.
- flex-direction: column; – This sets the direction of the flex container to column, making its children stack vertically. This is useful for arranging content in a column layout.
Conclusion:
In this tutorial, we’ve built a simple weather web app using ReactJS. We covered the basics of creating components, managing state, fetching data from an API, and handling user input. This should serve as a solid foundation for beginners looking to build more complex React applications in the future.

